Hey! Today’s guest post is my precious friend Regina! Regina and I met in a bible study in college and became great friends! She is one of the sweetest people ever! Unfortunately, she and her husband Joey left OKC for Flatsmellyland, Texas, and I miss her terribly! But thanks to the power of Facebook, blogging, and Twitter, we are able to keep in touch. She is super crafty, and today’s post is a few fun DIY projects! Enjoy, and be sure to stop by her and check out her sites listed at the bottom!
—————————————-
Hi y’all! I’m Regina and I have known Ashley for, oh… I guess going on 6 years now. (Yikes, girl, has it really been that long… lol.) First off, some of my favorite things about Ashley include, but are not limited to, her intense love of N*SYNC which I will not fault her for because of course everyone knows that BSB were, and always will be, the best (and I’m loving the fact that she has to post this to her blog… hehehe…) [hardest thing EVER for me to post!]; her incredible sweetness; her wonderful family; and her ability to make people always feel important. Although, for your sake, I hope you’re never around her when tornadoes are in the area because she does tend to panic… a LOT.
Anyway, like I said, I’m Regina and all you need to know right now is I’m a lover of music, listography, animals, children, God, photography, prayer, rainbows, fashion, crafting, unicorns and narwhals. The rest of me you can find out later by checking out my various sites listed at the end of this post.
Now that the formalities are out of the way… on to the GOOD STUFF! When Ashley asked me to be a guest blogger I was super honored and immediately went to my "blog book" to figure out what I wanted to post about. But it wasn’t until later when I was playing around on Pinterest that I made my final decision. I just kept coming across one amazing idea after another. What makes these ideas so amazing is 1) How gorgeous the finished product is and 2) How inexpensive these little DIYs are. Gorgeous AND inexpensive?… umm… yes please! So I hope you’ll enjoy these great ideas and maybe have yourself a little DIY party sometime soon? I know I’m already saving up my TP rolls…
 image via Original source unknown;
edited version seen here via everythingfab.com
I love maps. Back when I was a kid we used a good ol’ atlas when we went on road trips, and I loved sitting in the back seat with the huge atlas spread out on my lap and taking my own little "detours" and imaginary trips. I am ever so thankful we have GPS nowadays, but I do still love looking at maps. And what a gorgeous way to display some vintage looking maps! All you need is maps, picture frames, and your imagination. Incredible wall art/decor display….DONE!
 image via twopeasinabucket.com
Another super easy project. Some white or even a colored cardstock, a few leftover buttons, some leftover scrapbook paper, a picture frame and VOILA, a sweet little gift for mom on Mother’s Day, or to fill space on a table or shelf somewhere. Brilliant!
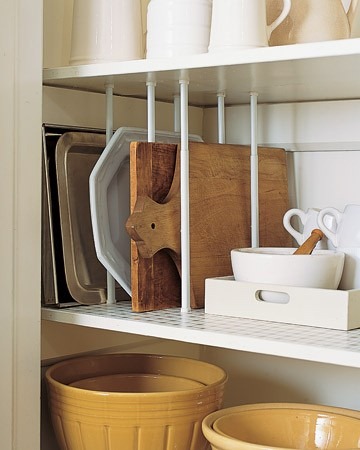 image via marthastewart.com
Okay, so this isn’t exactly a craft project but it’s a super easy solution to one of life’s big annoyances. Try it out, you can thank me later. Oh okay, you can thank Martha later…
 image via tomkatstudio.blogspot.com
Let’s see… one part left over fabric, one part a couple of free hours while watching a movie like… say… ‘You’ve Got Mail’, and the result is a lovely banner to spruce up your next party. I’m also thinking of hanging it on a table, hanging it up in a doorway, or even making a little girl an adorable hula skirt for her to twirl around the house in. Oh the endless possibilities!! Thank you, leftover fabric, for being so versatile!
And now, for the grand finale… whoever would have thought that toilet paper/paper towel rolls could be so pretty!
 image via myrtleandeunice.com
A lovely design. All you have to do is save up some rolls, cut them all the same width, and get after them with a hot glue gun (preferred) or craft glue. I also saw on one of the sites that you can use clothes pins to hold the rolls together while they’re drying so there’s a little easy tip for you! I’m seriously saving up my rolls in the house to do something like this for my office. Although, I think I’m going to spray paint them all a solid color afterwards… I just can’t decided between black or white. And for a different design….

 images via growingupcreative.com
Hmm… now I can’t decide if I want the first design or the second design or somewhere in the middle… I think I’ll just get started on it and see where the craft takes me. That seems like a better option, right?
Alrighty, well, that’s all I have to share for today. I hope one or all of these inspired you to channel your inner Martha Stewart and make something super cute & super awesome for super cheap! Thanks to Ashley for inviting me along on her "carnival ride" and letting me share some awesome stuff with you all. And now, I bid you adieu and leave you with all of my many sites. I hope to "see" you around!
Take care & love,
Regina
Blog:
www.livedelightfully.blogspot.com
Twitter:
http://twitter.com/#!/VivatReginaC
Etsy Shops:
www.vivatregina.etsy.com
www.vivatreginasupplies.etsy.com
Facebook: http://www.facebook.com/#!/VivatReginaCrafts

OMG! I love the map wall art! I’ve been trying to think of ways to incorporate West Virginia and Ohio into our new place in NY, and I’ve FOUND it! Perfect!
Love the button heart! Might get my little girl to make one for her grandma for Mother’s Day! So cute :)
These are FABULOUS! I’m so inspired. : ]
Thanks Regina & Ashley!
B
Very cool stuff!
I love all of those! The button heart and the toilet paper rolls would be so easy to do!
I love the paper towel roll art!! It looks great.
If all of my Mondays could include reading sweet comments from lovely people, I think I could write a song on how wonderful Monday is. Thanks again for including me Ashley, and thanks to everyone who’s now following my blog/twitter/etc & who has left a sweet comment.
From one whose heart is singing,
Regina ;)
Ok, I am totally dying over those maps! What an awesome idea!
And I was going to give the TP rolls to the bunnies to play with. Now I am in a dilemma. Hmmm…
Well, anyway, thank you for the great ideas!!!
This is an awsome post! THANK YOU so much!